
dimensionCheck
![]() Click the icon for a Video Example (requires internet connection)
Click the icon for a Video Example (requires internet connection)
dimensionCheck is a command that allows the user to check selected categories in the active view and (optionally) all sub-views and find which elements are not dimensioned. It is designed primarily to be a quality control check assistant for dimension plans.
Starting the Command
 To start checking dimensions you will need the dimensionCheck palette open. To open the palette simply click the 'Dimension Palette' button which is located on the workFlow panel of the Revolution Design tab. This button toggles the palette on and off so if the palette is visible it can also be used to hide the palette.
Palette Control
The diagram below shows the dimensionCheck palette control and it's basic functions:
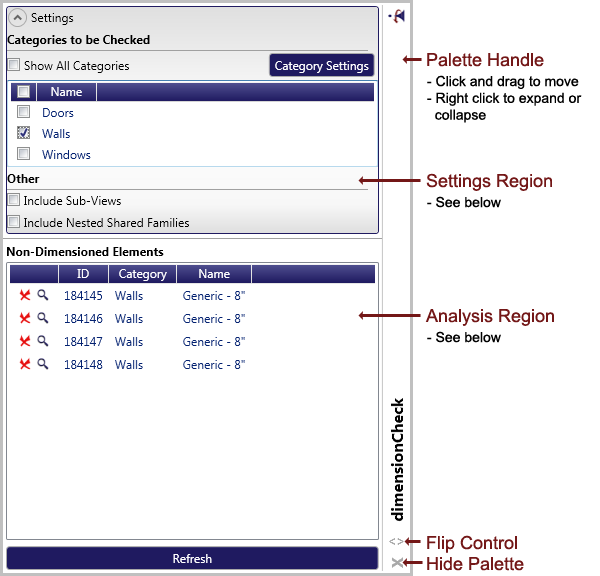
The palette remembers its size, position, and flip orientation from session to session.
Settings
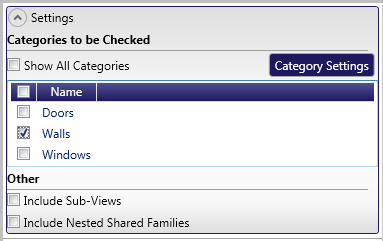
The settings for dimensionCheck are contained in the settings region of the palette. This is an expandable section and as such can be collapsed for additional screen real estate when settings are as desired.
The primary settings are as follows:
- Categories to be Checked - Determines which categories will be included in this check. For example if you are checking that all walls are located, you would check only the 'Walls' category.
- Because of the extensive list of categories in Revit and the fact that many are never dimensioned, not all categories are shown by default. If desired, all categories can be shown by checking the 'Show All Categories' button.
- To revise the categories shown when 'Show All Categories' is not checked use the 'Category Settings' button. See the category settings help section below for more information.
- Include Sub-Views - If unchecked, dimensionCheck will check only the active view for dimensions when determining if an element has been dimensioned or not. If checked, dimensionCheck will check the active view and all views called out in the active view (i.e. enlarged plans).
- Include Nested Shared Families - If unchecked, only top level families in the selected categories will be checked for dimensions. If checked, nested families will be checked as well.
Once you have selected the options you want, press the 'Refresh' button to find un-dimensioned elements.
Analyzing Results
Upon pressing the refresh button on the palette the analysis region will be updated to show either a simple piece of text stating that no undimensioned elements were found or a list of elements in the selected categories that have not been dimensioned.
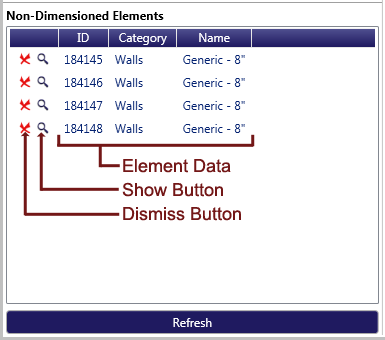
If non-dimensioned elements are found the display will be updated similar to the example shown above. The primary elements of the analysis section are as follows:
- Element Data - These columns simply lists the Element ID, Category, and Name of all non-dimensioned elements found.
- Show Button - Press this button to select and show the element in the Revit interface.
- Dismiss Button - Press this button to dismiss the element temporarily from the list. Note that if you press refresh and the element still has not been dimensioned it will return to the list.
Category Settings
For new installations, the palette lists a default set of categories that represent a broad range of categories that can be dimensioned in Revit. However, many offices will probably never need to check dimensions for all of these categories. Because of this, the list of available categories can be customized by using the 'Category Settings' link on the palette.
This will bring up the Category Settings dialog (shown below) that allows selection of what categories should be available. Simply select the 'Primary' checkbox for each category that should always be visible and then press 'Done'. You can also revert to default categories by pressing the 'Set to Default' button.
This setting will persist from session to session, so setting this once will cause only relevant categories to be displayed until the setting is changed again.
