
viewRename
![]() Click the icon for a Video Example (requires internet connection)
Click the icon for a Video Example (requires internet connection)
viewRename is an addin that allows the user to define a view naming standard and automatically name views based on the standard.
viewRename Settings
The viewRename settings dialog consists of four primary regions:
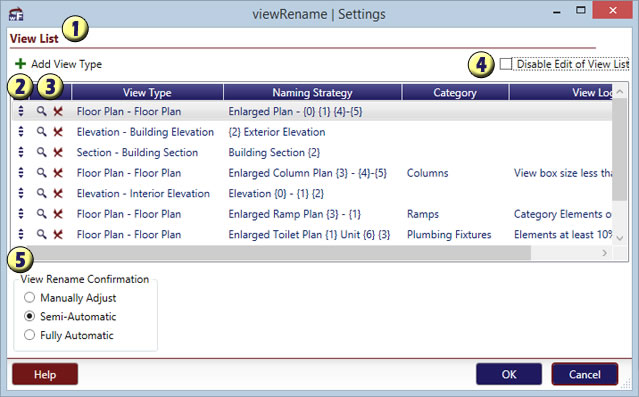
- View List – These settings are the primary way you will
set up your company view naming standard, so it has been made as customizable as possible.
Add View Type allows you to add additional view types to the list.
 The View Type relates to the name that you see in the properties box when you select the view. If you have Revit users that tend to duplicate and add new view types, just ask them to add text to the end of the view type name so that viewRename will still understand how to handle this view type.
Naming Strategy is the text that defines the structure of view name. In order to modify these View Parameters, you will need to select the edit button to modify a specific view or the add view type button to add a new type.
Category is related to the View Logic field and is used to differentiate similar view types. When you create a callout view, sometimes you would like it to rename the view depending on what objects exist in the room (for example: Enlarged Stair plan). Use this field in combination with View Logic to assign as specific name to a view.
The View Logic field controls many aspects of how viewRename selects the correct View Type. Below is a quick description of each option:
- Elements at least 10% of view box – using the Category field, this option will be selected if 10% or more of the callout area is filled with elements of that category.
- Elements at least 50% of view box – using the Category field, this option will be selected if 50% or more of the callout area is filled with elements of that category.
- Category Elements of at least 1 – using the Category field, this option is selected if at least 1 element of that category is present in the view.
- Category Elements total 5 of more – using the Category field, this option is selected if at least 5 elements of that category are present in the view.
- View box size less than 150 SF – this logic simply sizes the callout area for the view and determines if it is less than 150 SF.
- View box size larger than 150 SF – this logic simply sizes the callout area for the view and determines if it is larger than 150 SF.
- Active View type – Section – the default active view for viewRename is a floor plan but occasionally you will draw a callout view inside a section view and this logic will allow the program to determine how to handle the naming.
- Active View type – Elevation – the default active view for viewRename is a floor plan but occasionally you will draw a callout view inside an elevation view and this logic will allow the program to determine how to handle the naming.
- Drag handles. Use these handles to drag and drop to rearrange the order of naming strategies.
- Modify Strategies -Use these buttons to edit or remove the associated naming strategy. Clicking the modify button will allow you to modify any of the fields in the view list as well as the following items:
- In addition to the four Parameters already described, the View Template field is available if you would like to assign a specific view template to a view. Many firms have their own view template strategy and this can be quite helpful for keeping views consistent in appearance. If you have no view template that you would like to default the view to just select <Existing> and it won’t affect the view template.
- Newly added with v4.5, the Hide at scales coarser than option will allow you to hide large annotations like building sections by modifying this parameter in the view. Typically this is a parameter that you must individually modify by selecting each view that needs to be hidden.
- View Legend – There are the 7 dynamic options driven from the model components that you may use in the view name structure. Below is a description of each option:
- In addition to the four Parameters already described, the View Template field is available if you would like to assign a specific view template to a view. Many firms have their own view template strategy and this can be quite helpful for keeping views consistent in appearance. If you have no view template that you would like to default the view to just select <Existing> and it won’t affect the view template.
- {0} = Room Name – As expected, this is the room name from the room that is closest to the view you are renaming.
- {1} = Room Number – this is the room number from the room that is closest to the view you are renaming.
- {2} = Direction – this option has different results depending on what type of view you are using it on. For an elevation on a floor plan, you will obviously get the direction the view is pointing (North, East, South, or West). For a building elevation view, the directions are flipped because of how we typically associate exterior elevations. With a section view on a floor plan, the direction will refer to the side of the building being cut (Example: North wall).
- {3} = Level – As expected, this is the level closest to the view you are renaming.
- {4} = Grid Horiz. – this option finds the grid line that is closest to the view you are renaming that is running horizontal to the view.
- {5} = Grid Vert. – this option finds the grid line that is closest to the view you are renaming that is running vertical to the view.
- {6} = Active Viewname – occasionally you will need to designate a view by what Unit or Building it is located in (as an example). To do this, simply choose a Keyword and Modification (explained in the next paragraph).
Modification / Keyword – These fields are used to modify the information as follows:- lowercase – as the name suggests, this turns everything lowercase.
- UPPERCASE – as the name suggests again, this turns everything uppercase.
- Abbreviated – this modification is a bit limited at the moment, if you would rather label your Level as “Lvl” you can choose this.
- Use word before – this is designed to work with Active Viewname for the most part and requires a Keyword. It will filter and use the word before the Keyword.
- Use word after – this is designed to work with Active Viewname for the most part and requires a Keyword. It will filter and use the word after the Keyword.
- Unchanged – As the name suggests, it will leave the text unchanged.
For example, {0} becomes the room name and {1} becomes the room number as it relates to the location of the view.
- Disable Edit of View List – This checkbox is a safe guard to prevent users from modifying the view list (to maintain the company standard).
- View Rename Confirmation – This setting allows you to skip a step or two when custom modifications to the view name are unnecessary. The setting has the following 3 options:
- Manually Adjust - This setting will display the full rename dialog box for every view that you rename. The dialog box will default to the automatically detected values but will allow you to adjust manually.
 Semi-Automatic - This setting shows the dialog to the right for every view that you rename. The suggested view name will be presented and you will be allowed to accept the name or press 'Retry' to be given the full dialog to adjust naming.
- Fully Automatic - In this mode views will be automatically renamed based on teh standard with no input fromt the user. This mode is recommended once you have your settings fully set and are comfortable with how names are handled.
Rename View
After you have placed a few views (elevation, section, or callout) you will be ready to update the view names to your firm standard. Simply select this button and pick the view you would like to rename. Keep in mind that you will only be able to select actual views (not references to other views such as "Sim.")

The viewRename dialog will automatically select the view name settings that correspond to the view. With Manually Adjust mode, you can always make changes if the view name is incorrect by clicking on the list boxes or the check boxes or even manually typing the view name. You also have the option to change the View Type (if the wrong selection was made).
You may then specify the view template to assign to the view.
Once you are satisfied with the view name, just click on the OK button to set the name.
After you have renamed the view, you will have the option to select another view and continue renaming views. Once you are done you can simply escape out of the command and review the project browser for other non-standard view names.
Instant Updater
One of the best ways to enforce a view naming standard is to automatically name views as they are created. This is possible with viewRename and actually works quite efficiently.
However, due to the potential for an updater warning screen to appear to users that do not have viewRename installed, the updater has been disabled by default.
First, save and close the Revit program. To update your viewRename settings file, open the following directory: “C:\Users\{username}\AppData\Roaming\Revolution Design\Workflow\4_5” and open workFlow_Settings.xml in a text editor (Notepad).
 Now you just find the <instantUpdate> setting that is a sub-node of the <viewRename> node and change the text from false to true. Save and close the file and open Revit again.